Previously people who used hosted account like blogger or WordPress and registered their website with www.example.blogspot.com or www.example.WordPress.com was enough and they qualified AdSense approval stage with such address but in the recent times Google new policies has made it clear that if you are looking forward to convert your passion into profit you will have to purchase a top level domain i.e www.example.com.
There are many domain registering companies from which you can choose and buy domain suitable as per your website. Here is list of some domain hosting providers
- Godaddy.com
- Hostgator.com
- Greengeeks.com
- Dream host.com
- Namecheap.com
- Myhosting.com
- Fatcow.com
In this section we have chosen godaddy and we will see step by step process of implementation of your selected domain to your website.
Sign in to your godaddy account and search your domain. If available, add it to your cart and if promocode is available for discount apply it. Proceed for payment and complete the payment. I hope this much of work you would have done.
Now in a new tab open your blog/website dashboard.
- Go to settings
- Click basics
- you will see blog address in publishing section. Just below it you will find a link (+ setup third party URL for your blog).
- click on the link
- Now enter the newly registered domain " www.example.com complete.
- In place of missing host file click "yes".
- Save it
- You will see name, level or host field and point to field/target/destination. Given below is example of such. You will get different code but it will be similar to it.
Name, level or host. Point to
www. ghs.Google.com
CJbhgg4rp. GPV.4hffcgyrew79.Googlehosted.com
- Now open your godaddy page and click on the newly purchased domain. Go to the DNS section.
- click on Add Record --> A (Host). You'll need to create four separate A-records which point to four different Google IPs which are as under. Note - save every time you enter the IP
216.239.32.21
216.239.34.21
216.239.36.21
216.239.38.21
- At the place of HOST fill '@'
- And at the place of POINT TO fill the first IP and save it. Follow the process 4 times.
- After you have entered IP's, go to Add Record once again and select CNAME
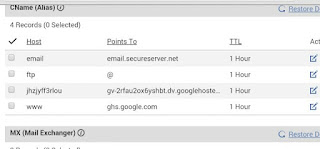
- Go to blogger and copy the host and destination in CNAME (Alias) section as shown below.

- Finally save it. You are done with it. The change will take place in few hours. Maximum it takes 4-5 hours for the change to be in effect.


The Merit Casino Login – Login to my profile
ReplyDeleteThis is 메리트 카지노 쿠폰 the full 메리트 카지노 list of login portals for the Merit Casino login page, which is easily followed. Login the 1xbet Merit Casino Login page to get started.